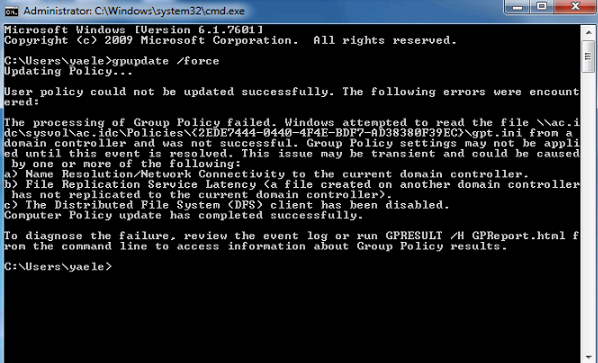
The processing of Group Policy failed. Windows attempted to read the file \\domain.local\sysvol\ac.idc\Policies\{2EDE7444-0440-4F4E-BDF7-AD38380F3897}\gpt.ini from a domain controller and was not successful. Group Policy settings may not be applied until this event is resolved. This issue may be transient and could be caused by one or more of the following:
a) Name Resolution/Network Connectivity to the current domain controller.
b) File Replication Service Latency (a file created on another domain controller has not replicated to the current domain controller).
c) The Distributed File System (DFS) client has been disabled

In My case, the User Policy can’t apply because the user account has too many groups, which cause a too large Kerberos token size.
Solution :
You can resolve this issue by installing the hotfix and then:
1. Start Registry Editor (Regedt32.exe).
2. Locate and click the following key in the registry:
System\CurrentControlSet\Control\Lsa\Kerberos\Parameters
3. If this key is not present, create the key. To do so:
4. Click the following key in the registry:
System\CurrentControlSet\Control\Lsa\Kerberos
5. On the Edit menu, click Add Key.
6. Create a Parameters key.
7 .Click the new Parameters key.
8. On the Edit menu, click Add Value, and then add the following registry value:
Value name: MaxTokenSize
Data type: REG_DWORD
Radix: Decimal
Value data: 65535
![clip_image001[4]](https://www.itblog.co.il/wp-content/uploads/2015/06/clip_image0014_thumb.png)
Or You can just remove some groups where the user belong in the old / new domain
Good luck 🙂


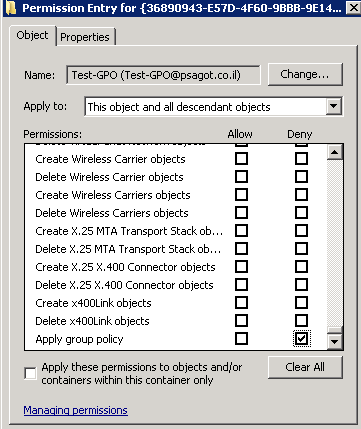


![clip_image001[4]](https://www.itblog.co.il/wp-content/uploads/2015/06/clip_image0014.png)