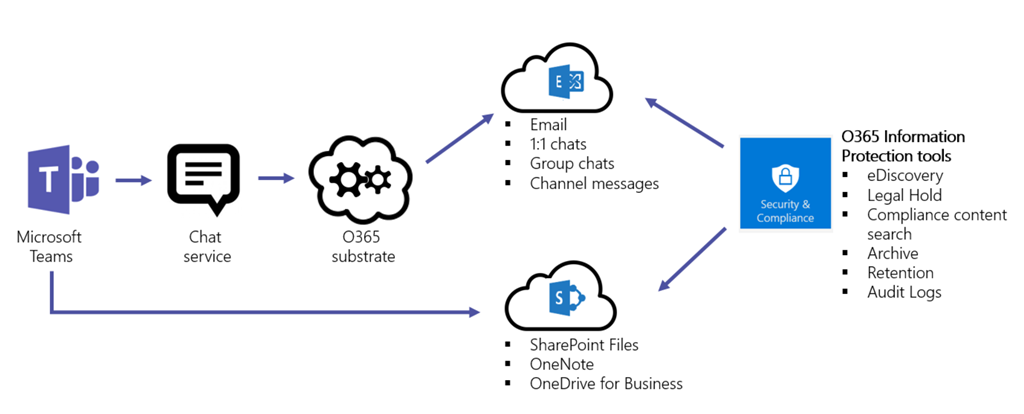
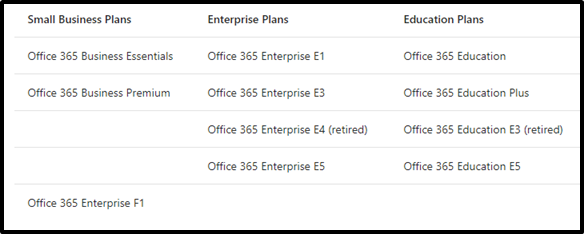
Upgrade brocade FC switches firmware Step-By-Step guide
Brocade switches have two firmware partitions, this means that their firmware can be upgraded without downtime, this process is done as follows:
The upgrade process will upgrade the firmware of one boot partition, then reboot that partition without interrupting the normal operation, next the switch will change the updated partition to be the active partition and only then upgrade the second partition firmware immediately.
There is also an option to stage the installation and have only one firmware partition updated but this option will cause a disruptive update, disconnecting all the connections to the switch, this is done by adding “firmwaredownload -s” parameter to the update command (You can look for example screenshots below).
Preparation:
Before we begin we need a few things ready:
a. An FTP or sFTP server for saving a backup of the existing configuration and also downloading the new firmwares to the switches
b. Download the firmwares from the vendor’s website (in my case it’s from EMC)
Before you download the latest firmware from the vendor’s site you need to know what is your proper upgrade path (which version need to be installed first in order to avoid disruptive installations or lost of configuration).
To find my current firmware I login to the switch and run:
“firmwareshow”
![clip_image001[4]](https://www.itblog.co.il/wp-content/uploads/2017/04/clip_image0014_thumb.png)
*This screenshot was taken after I’ve already did the first update from 6.4.x.
Finding out the proper upgrade path is a bit tricky because there isn’t a concentrated location of all the proper paths, if I want to upgrade from version 6.4.X to 7.4.X I need to search for the document that describes how to update to version 7.4.X and see if 6.4.X can be updated without disruption.
Searching Google for this:
“Brocade Fabric OS Upgrade Guide, [x.x.x]”
Where [x.x.x] should be replaced with the version you want to upgrade to helped me to find the paths:
This is an example of the upgrade path of version 7.4.0 table:
![clip_image003[4]](https://www.itblog.co.il/wp-content/uploads/2017/04/clip_image0034_thumb.jpg)
As you can see in order to have a nondisruptive upgrade I need to upgrade from version 7.3.X,
Searching again for the upgrade to 7.3.X I’ve found again that the only version that will work without disruption is 7.2.X:
![clip_image004[4]](https://www.itblog.co.il/wp-content/uploads/2017/04/clip_image0044_thumb.png)
In my case I continued until 7.0.X and found out that in order to update from 6.4.X I need to do a 5 step process updating from 6.4 to 7.0 then to 7.1, 7.2, 7.3 and finally 7.4 in order to avoid disruptions, but in my case this is a lab ENV so I’ve jumped two version at one of the times.
It’s a long process indeed but it prevents down time which totally worth it.
Now, after noting all the needed versions we need to download the proper files, for all the brocades its basically the same firmware if downloaded from any vendor but its recommended to use your vendor’s firmware, in my case it’s EMC so I will show screenshots from EMC’s site.
Downloading the firmwares
Login to: https://support.emc.com/downloads
Search and select: “Connectrix – Brocade”
![clip_image006[4]](https://www.itblog.co.il/wp-content/uploads/2017/04/clip_image0064_thumb.jpg)
Then select your switch from the list and download the proper versions, pay attention to the checksum link and verify each downloaded file’s MD5 check some after download to verify that the downloaded file is full (I use “http://implbits.com/products/hashtab/” to generate the MD5 of the files)
![clip_image008[4]](https://www.itblog.co.il/wp-content/uploads/2017/04/clip_image0084_thumb.jpg)
Now we have the zip files, after unzipping and sorting the directories it should look like this:
![clip_image009[4]](https://www.itblog.co.il/wp-content/uploads/2017/04/clip_image0094_thumb.png)
*not all brocades versions share the same sub-versions of the Fabric OS so if you plan to update more then one brocade type you should look for the proper sub-versions for each one, in my case I had three different versions and to avoid mistakes and also save some download time (each file is between 800MB to 1.2GB) I searched all the versions for shared sub-versions, that way I’ve downloaded each major version only once.
Next step is to backup our current configuration:
Login to the switch and run these commands:
“cfgsave”
“configupload”
![clip_image011[4]](https://www.itblog.co.il/wp-content/uploads/2017/04/clip_image0114_thumb.jpg)
Now I have a file called “config.txt” on the root of my FTP server, in case of a problem that will cause my switch to lose its configuration I will be able to restore the old configuration by using the “configDownload” command, this is a disruptive action and will require to run the “switchDisable” command before it can be run:
![clip_image012[4]](https://www.itblog.co.il/wp-content/uploads/2017/04/clip_image0124_thumb.png)
The error that you see: “configDownload: Edge Hold Time (0) is out of range (80..500)”
Mentions that the config.txt file that I’ve generated in the previous step contains an invalid configuration at the “Edge Hold Time” or “EHT” section of the config.txt file, I’ve opened the file with notepad, searched for “edgeHoldTime” and noticed that in my file it was configured to: “0”.
Depending on your switched current version you should change the value from “0” to either 220 or 500:
![clip_image014[4]](https://www.itblog.co.il/wp-content/uploads/2017/04/clip_image0144_thumb.jpg)
You can refer to this table for the proper value:
![clip_image015[4]](https://www.itblog.co.il/wp-content/uploads/2017/04/clip_image0154_thumb.png)
After changing the value to 220 and saving the file I was able to download the configuration back to the switch:
![clip_image016[4]](https://www.itblog.co.il/wp-content/uploads/2017/04/clip_image0164_thumb.png)
And also run the “switchenable” command again to start working again.
Now lets start the update process:
You should use the “firmwaredownload” command and supply all the information it asks, its very straight forward and easy to understand and it looks like this:
![clip_image018[4]](https://www.itblog.co.il/wp-content/uploads/2017/04/clip_image0184_thumb.jpg)
Connecting to the switch right after it boots up and running firmwareshow a few time returned the following output which shows the progress of the update:
![clip_image020[4]](https://www.itblog.co.il/wp-content/uploads/2017/04/clip_image0204_thumb.jpg)
And I’m done with the first update, now you should repeat the same thing with all the other versions until you reach your final version.
A few examples of things you should not do and how do they look like:
Trying to update from 7.0.X straight to 7.4.X generates the following error:
![clip_image022[4]](https://www.itblog.co.il/wp-content/uploads/2017/04/clip_image0224_thumb.jpg)
Trying to update from 7.0.X straight to 7.3.X generates the following error:
![clip_image024[4]](https://www.itblog.co.il/wp-content/uploads/2017/04/clip_image0244_thumb.jpg)
Now when I run the same try but with adding the “-s” flag I get the following warning:
![clip_image026[4]](https://www.itblog.co.il/wp-content/uploads/2017/04/clip_image0264_thumb.jpg)
In my case because it’s a lab ENV I did upgraded using this way but if you don’t want down time you shouldn’t use this option.
A few examples of special cases:
Running “firmwareshow” after jumping two versions using the “-s” flag, and then running “firmwareCommit”:
![clip_image027[4]](https://www.itblog.co.il/wp-content/uploads/2017/04/clip_image0274_thumb.png)
Running “configdownload” without running the “switchDisable” command first:
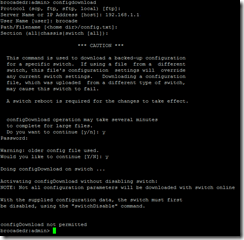


![6_thumb[1]](https://www.itblog.co.il/wp-content/uploads/2017/12/6_thumb1.jpg)
![7_thumb[1]](https://www.itblog.co.il/wp-content/uploads/2017/12/7_thumb1.jpg)

![9_thumb[198]](https://www.itblog.co.il/wp-content/uploads/2017/12/9_thumb198_thumb.jpg "9_thumb[198]")

![clip_image001[4]](https://www.itblog.co.il/wp-content/uploads/2017/04/clip_image0014.png)
![clip_image003[4]](https://www.itblog.co.il/wp-content/uploads/2017/04/clip_image0034.jpg)
![clip_image004[4]](https://www.itblog.co.il/wp-content/uploads/2017/04/clip_image0044.png)
![clip_image006[4]](https://www.itblog.co.il/wp-content/uploads/2017/04/clip_image0064.jpg)
![clip_image008[4]](https://www.itblog.co.il/wp-content/uploads/2017/04/clip_image0084.jpg)
![clip_image009[4]](https://www.itblog.co.il/wp-content/uploads/2017/04/clip_image0094.png)
![clip_image011[4]](https://www.itblog.co.il/wp-content/uploads/2017/04/clip_image0114.jpg)
![clip_image012[4]](https://www.itblog.co.il/wp-content/uploads/2017/04/clip_image0124.png)
![clip_image014[4]](https://www.itblog.co.il/wp-content/uploads/2017/04/clip_image0144.jpg)
![clip_image015[4]](https://www.itblog.co.il/wp-content/uploads/2017/04/clip_image0154.png)
![clip_image016[4]](https://www.itblog.co.il/wp-content/uploads/2017/04/clip_image0164.png)
![clip_image018[4]](https://www.itblog.co.il/wp-content/uploads/2017/04/clip_image0184.jpg)
![clip_image020[4]](https://www.itblog.co.il/wp-content/uploads/2017/04/clip_image0204.jpg)
![clip_image022[4]](https://www.itblog.co.il/wp-content/uploads/2017/04/clip_image0224.jpg)
![clip_image024[4]](https://www.itblog.co.il/wp-content/uploads/2017/04/clip_image0244.jpg)
![clip_image026[4]](https://www.itblog.co.il/wp-content/uploads/2017/04/clip_image0264.jpg)
![clip_image027[4]](https://www.itblog.co.il/wp-content/uploads/2017/04/clip_image0274.png)

