Installation of exchange server 2010 SP3 UpdateRollup Failed with event log 1023 Eventvwr

“Update Rollup 17 for Exchange Server 2010 Service Pack 3 (KB4011326) 14.3.352.0′ could not be installed. Error code 1603”

:After searching the web I’ve found a way to run the setup with verbose log redirected to a file

“Exchange2010-KB4011326-x64-en.msp /lxv*! c:\Rollup.log”

And this is the log that I’ve got

clip_image001

Searching the c:\Rollup.log file didn’t helped me at all,

Finally I’ve deleted the folder: “C:\ExchangeSetupLogs”

And ran the setup again,

After the installation failed I saw that inside of “C:\ExchangeSetupLogs” folder there were 3 new files, one of them was “ServiceControl.log”

Researching this file I’ve located the following error:

“[Error] System.Management.Automation.ParseException: At C:\Program Files\Microsoft\Exchange Server\V14\Scripts\ManageScheduledTask.ps1:462 char:5”

Then I’ve opened the file in the mentioned location using PowerShell ISE, navigated to line 462 and saw that there was an error: “Flow of control cannot leave a Finally block.”

clip_image002

I backed up the file before changing that line to: “Write-Verbose $success”

clip_image003

Then rerun the setup and it completed successfully!

Just to be on the safe side, after the installation finished successfully I’ve returned the backed up script

Posted in Exchange 2010 | Tagged , , , , , | Leave a comment

Microsoft Teams Update announcement – February 14, 2017


Microsoft Teams has been in preview for several months. We hope that you had the opportunity to evaluate it for your organization. As we communicated in December, in MC89318, Microsoft Teams is currently off by default at the tenant level. Later this quarter, Microsoft will begin enabling Microsoft Teams to be on by default at the tenant level, for all eligible users with the appropriate license assignment. IT admins can continue to manage user access to Microsoft Teams via license assignments. This message is associated with Office 365 Roadmap ID 61652.

How does this affect me?

When we make this change, the ‘Turn Microsoft Teams on or off for your entire organization’ setting in ‘Settings > Services and Add-ins > Microsoft Teams’, will go from a default value of “off” to a default value of “on”.

Microsoft Teams will then be available to all eligible users with the appropriate license assignment. Once we turn Teams on-by-default, it will become available to those users. IT admins can continue to manage user access to Microsoft Teams via license assignments. Microsoft Teams will be rolled out gradually to all eligible Office 365 users later this quarter. Microsoft Teams is available in the following Office O365 commercial suites: Business Essentials, Business Premium, and Enterprise E1, E3, and E5 plans. Microsoft Teams will also be available to existing E4 customers who purchased E4 before its retirement. Microsoft Teams is not available to Education and Government customers at this time.

What do I need to do to prepare for this change?

If you do not rely on this setting to govern user access to Microsoft Teams, there is no action you need to take. Learn more by going to

 http://teams.microsoft.com.

If you currently rely on this setting to govern user access to Microsoft Teams, please migrate over to managing access via user licensing. Please click Additional Information to learn more, including how to use license assignments to enable or disable user access through Office 365 Admin center and PowerShell.

Posted in Office365 | Tagged , | Leave a comment

SCCM 2012 R2 – Collection Query for Internet Explorer

First you need to make sure that Asset intelligent is configured and enabled

Click on Asset and Compliance > Asset Intelligence  – Ensure that the following settings are show
1. Asset Intelligence Component : Enabled
2. Asset Intelligence Synchronization point status: Sync Point Deployed

image

image

2.  Configure Client Settings 

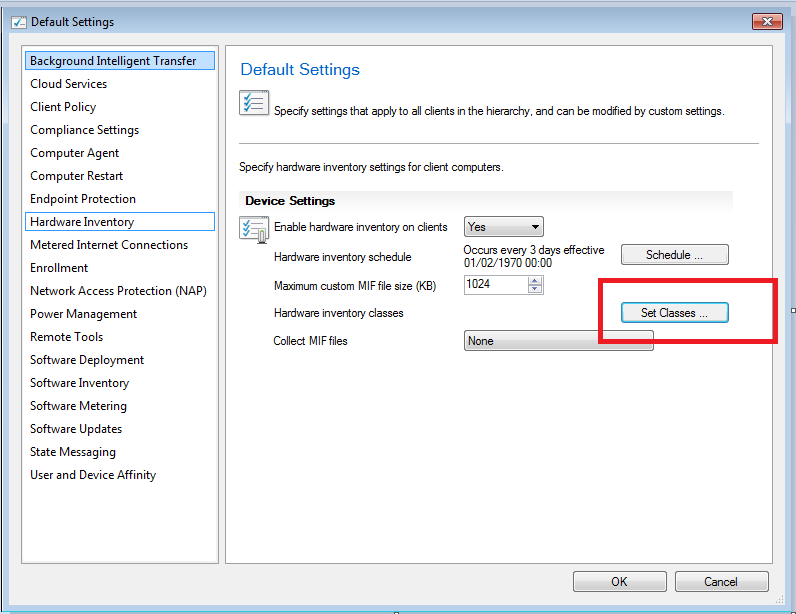
Go to Administration >  Client Settings –> Right click on Default Client Settings –>properties

image
select Hardware Inventory and ensure it is turned on.

 image

click on Set Classes…

image
Select Software ShortCut from the list  – Asset Intelligence (SMS_SoftwareShortCut) and make sure that everything is checked including File Version
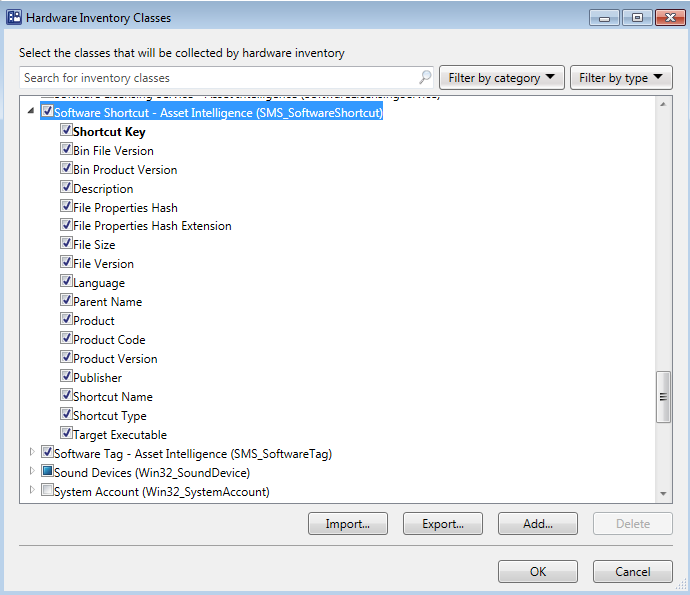
image

Click on OK.

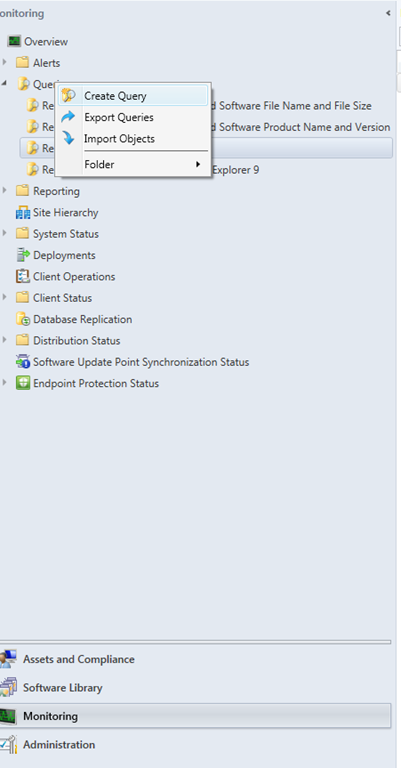
Now you are ready to create a query:

Open Configuration Manager on your Primary Site Server – >  Monitoring >  Right click on Query > Select new Query

image

Name : Computers with Internet Explorer
Click on Edit Query Statement
Click on Show Query Language
Copy and Past the following query:

Entire IE inventory in your IE environment

select distinct SMS_R_System.NetbiosName, SMS_G_System_SOFTWARE_SHORTCUT.FileVersion from  SMS_R_System inner join SMS_G_System_SOFTWARE_SHORTCUT on SMS_G_System_SOFTWARE_SHORTCUT.ResourceID = SMS_R_System.ResourceId where SMS_G_System_SOFTWARE_SHORTCUT.Description like “%Internet Explorer%”

For Specific Versions:

Internet Explorer 9

select distinct SMS_R_System.NetbiosName, SMS_G_System_SOFTWARE_SHORTCUT.FileVersion from  
SMS_R_System inner join SMS_G_System_SOFTWARE_SHORTCUT on SMS_G_System_SOFTWARE_SHORTCUT.ResourceID = SMS_R_System.ResourceId where SMS_G_System_SOFTWARE_SHORTCUT.FileVersion like "%9.00%"

Internet Explorer 10

select distinct SMS_R_System.NetbiosName, SMS_G_System_SOFTWARE_SHORTCUT.FileVersion from  
SMS_R_System inner join SMS_G_System_SOFTWARE_SHORTCUT on SMS_G_System_SOFTWARE_SHORTCUT.ResourceID = SMS_R_System.ResourceId where SMS_G_System_SOFTWARE_SHORTCUT.FileVersion like "%10.00%"

Internet Explorer 11

select distinct SMS_R_System.NetbiosName, SMS_G_System_SOFTWARE_SHORTCUT.FileVersion from  
SMS_R_System inner join SMS_G_System_SOFTWARE_SHORTCUT on SMS_G_System_SOFTWARE_SHORTCUT.ResourceID = SMS_R_System.ResourceId where SMS_G_System_SOFTWARE_SHORTCUT.FileVersion like "%11.00%"


Good luck סמיילי

Posted in SCCM 2012, SCCM 2012 R2 | Tagged , , , | Leave a comment

password never expires

<#

This script find all the users whose passwords never expire and send a report to mail.
Idit Bnaya

#>

Import-Module activedirectory
$date=Get-Date
$date1 = $date.ToShortDateString()
$date2 = $date1.Replace("/","_")
$FolderPath = ‘c:\temp’
 
Get-ADUser -filter * -Properties PasswordNeverExpires | where {($_.PasswordNeverExpires -eq $true)}  |select name,SamAccountName,DistinguishedName,PasswordNeverExpires |Export-Csv $folderpath\"passnerverexpired"’  ‘$date2.csv

$smtpServer = "SMTP Address"
$smtpFrom = "ReportPasswordneverexpired@idit.com"
$smtpTo = "idit.bnaya@iditbnaya.com"
$messageSubject = "PasswordNeverExpired "+" "+$date

Send-MailMessage -To $smtpTo -From $smtpfrom -SmtpServer $smtpServer -Subject $messageSubject -BodyAsHtml -Attachments $folderpath\"passnerverexpired"’  ‘$date2.csv

Posted in PowerShell | Tagged , | Leave a comment

Who am I – VB Script

‘ This script returns the following details on the local computer:

1. IP address

2. Computer name

3. Last reboot time

4. user name

image

I compiled it to exe and push it to all the workstations using GPO

It looks like this

image

Copy and save as vbs file:

@@@@@@@@@@@@@@@@@@@@@@@@@@@@@@@@@@@@@@


Function WMIDateStringToDate(dtmBootup)
WMIDateStringToDate = CDate(Mid(dtmBootup, 5, 2) & “/” & _
Mid(dtmBootup, 7, 2) & “/” & Left(dtmBootup, 4) _
& ” ” & Mid (dtmBootup, 9, 2) & “:” & _
Mid(dtmBootup, 11, 2) & “:” & Mid(dtmBootup, _
13, 2))
End Function
Dim NIC1, Nic, StrIP, CompName, objWMIService, colOperatingSystems, dtmBootup,  dtmLastBootupTime

Set NIC1 = GetObject(“winmgmts:”).InstancesOf(“Win32_NetworkAdapterConfiguration”)

For Each Nic in NIC1

if Nic.IPEnabled then

StrIP = Nic.IPAddress(i)

Set WshNetwork = WScript.CreateObject(“WScript.Network”)

CompName= WshNetwork.Computername
end If

Next

Set objWMIService = GetObject(“winmgmts:” & strComputer & “\root\cimv2”)
Set colOperatingSystems = objWMIService.ExecQuery(“Select * from Win32_OperatingSystem”)
For Each objOS in colOperatingSystems
dtmBootup = objOS.LastBootUpTime
dtmLastBootupTime = WMIDateStringToDate(dtmBootup)

MsgBox “IP Address: “&StrIP & vbNewLine _
& “Computer Name: ” &CompName & vbNewLine _
& “Last Reboot Time: “&dtmLastBootupTime & vbNewLine _
& “User Name : “& WshNetwork.UserName
‘MsgBox “Last Reboot: ” & dtmLastBootupTime
‘MsgBox “The current user is ” & WshNetwork.UserName

wscript.quit
Next

@@@@@@@@@@@@@@@@@@@@@@@@@@@@@@@@@@@@@

Good luck סמיילי

Posted in Profile, Scripts | Leave a comment

Define new topology for a clean Skype for business server environment

Topology Builder is used to create, adjust, and publish your topology.
Topology Builder also validates your topology before you begin server installations.
When you install Skype for Business Server 2015 on individual servers, the servers read the published topology as part of the installation process, and the installation program deploys the server as directed in the topology.
When you publish the topology, Skype for Business Server 2015 places the topology in the Central Management Database, which is created at this stage if it does not already exist. Then, when you install Skype for Business Server on each server in your deployment, the server reads the topology from the Central Management database and installs a replica copy of the Central Management Database into a new local SQL Server Instance.
Whether you use the Planning tool or Topology Builder to define the topology, you are required to publish the topology by using Topology Builder before you install Skype for Business Server 2015 on servers.
Using Topology Builder to plan and publish a topology is a mandatory step. You cannot bypass Topology Builder and install Skype for Business Server 2015 individually on the servers in your deployment.

This topology builder guide is a basic step by step guide for creating a new topology for Skype for business 15
The following are the high-level steps to publish your topology by using Topology Builder:

1. Open the topology builder tool

  • Lunch a new instance
  • Select New topology

image

2. Save the file

image

3. Add the sip domain

image

  • If you want to support any additional SIP domains you can add them (you can add them later)

4. Define the first site – this is the actual name of the central site in the topology builder itself

image

  • Specify the site details if you desire

5. Create you frontend pool

image

6. What type of pool would you like to create

  • Choose the pool you need for your environment and give it a name

image

7. Add the computers that will be part of this pool

image

8. If there any roles you would like to collocate

image

9. choose whether if not you want to use an edge

image

10. Define a SQL store

image

image

11. Define a file store – define a new file store for an existing share

image

12. Specify the web services URL 

image

13. Click FINISH

image

14. Publish The topology – this will publish the configuration in to the central management store

image

Good luck! סמיילי

Posted in Skype for buiness | Tagged , , | Leave a comment

ADSync error – OnlineIdentityException–0x8023134a–Last name was changed

I recently dealt with an issue with Office 365 and the "Directory Synchronization service manager" where two of the users who had been previously syncing to Office 365 with no problems started to receive the error "OnlineIdentityException "

The Error Description was:

"The cause of the error is not clear. This operation will be retried during the next synchronization. If the issue persists, contact Technical Support.

Tracking Id: 8a1fee60-18d9-4a4c-83d2-b17fbc074b20
ExtraErrorDetails:

image

After looking at all the old and new Attribute of the users under :Pending export" I notice that the last name was changed

image

This environment  is  Exchange online environment -  where all mailboxes are in the cloud.

I removed the old user Using "Windows Azure Active Directory Module for Windows PowerShell":


1. Connect to Office 365 via Powershell

2. Download and Install the "Windows Azure Active Directory Module for Windows Powershell" (available here)

3. Run the following commands (make sure you have the credentials for a global administrator for the Office 365 subscription)

Import-Module MSOnline

Connect-MsolService

get-msoluser -UserPrincipalName   "Useroldlastname@domain.com" |Remove-MsolUser

Check that the user is deleted from the cloud

get-msoluser -UserPrincipalName   "Useroldlastname@domain.com"

run the export stage again from the "Synchronization service manager"   and the problem was solved!

image

image


* Please notice – The Remove-MsolUser command is used to remove a user from the  cloud This command will delete the user, their licenses, and any other associated data. 

Enjoy סמיילי

Posted in Azure AD Connect, Dirsync, Office365 | Tagged , , , , | Leave a comment

SCCM – Adding driver package to a task sequence

1. First we need to create a folders and copy the Network, Display, Chipset, Audio, Modem, SATA drivers in to it.

For example OptiPlex3020Win7X64

2. Create a driver package in SCCM Console:

Give the package a name matching the folder name

Note: When you create a new driver package you must provide a network share that is not in use by other driver packages.

Distribute your driver package to DP’s

image


3. Add the  driver package to a task sequence

First we need to get the model name from the existing machine by Opening CMD on the Machine and type:  WMIC CSProduct Get Name

image

In task sequence “Apply driver package” task


image

Choose the Driver package you created

In the options tab, enter a task sequence variable of model equals "model name"

image

you can also use a WMI query instead such as

Select * from Win32_computersystem where model like "%OptiPlex 3020%"


Good luck סמיילי

Posted in SCCM 2012, SCCM 2012 R2, SCCM2007, System Center | Tagged , , , | Leave a comment

GPO – Event ID 1058, Group Policy gpt.ini–Solved

"The Processing of Group Policy failed. Windows attempted to read the file \\domain\sysvol\domain\policies\{xxxxxxxx-xxxx-xxxx-xxxx-xxxxxxxxxxxx}\gpt.ini from a domain controller and was not successful."


Under \\domain\sysvol\domain\policies\{xxxxxxxx-xxxx-xxxx-xxxx-xxxxxxxxxxxx}  – there was no ini file  so I realized that GPO is probably corrupted

In order to determine which group policy is causing this problem .I used PowerShell  to find the friendly name of that specific GPO:

Get-GPO -id 9189e970-5663-4866-92a0-0eb2a22aab0b |select DisplayName

image

After recreating the gpo everything worked fine.


More information about  Group Policy Cmdlets in Windows PowerShell:

https://technet.microsoft.com/en-us/library/ee461027.aspx

Posted in GPO | Tagged , , | Leave a comment

Remote desktop connection with 2 or more multiple screens

  • Hit “Winkey + R” to open the “Run” box
  • write mstsc and hit Enter

Run_Mstsc

  • Click the “Show options” button and go to Options tab, mark the “Use all my monitors” checkbox.

RDP_MultipleScreens

  • Enjoy!
Posted in Windows | Leave a comment