Tag Archives: Exchange

Installation of exchange server 2010 SP3 UpdateRollup Failed with event log 1023 Eventvwr

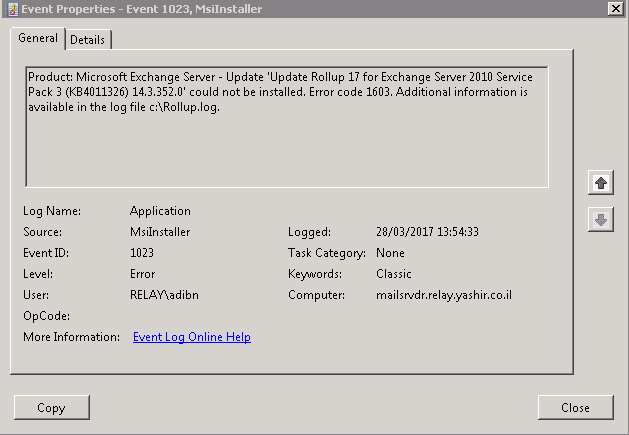
“Update Rollup 17 for Exchange Server 2010 Service Pack 3 (KB4011326) 14.3.352.0′ could not be installed. Error code 1603”

:After searching the web I’ve found a way to run the setup with verbose log redirected to a file

“Exchange2010-KB4011326-x64-en.msp /lxv*! c:\Rollup.log”

And this is the log that I’ve got

clip_image001

Searching the c:\Rollup.log file didn’t helped me at all,

Finally I’ve deleted the folder: “C:\ExchangeSetupLogs”

And ran the setup again,

After the installation failed I saw that inside of “C:\ExchangeSetupLogs” folder there were 3 new files, one of them was “ServiceControl.log”

Researching this file I’ve located the following error:

“[Error] System.Management.Automation.ParseException: At C:\Program Files\Microsoft\Exchange Server\V14\Scripts\ManageScheduledTask.ps1:462 char:5”

Then I’ve opened the file in the mentioned location using PowerShell ISE, navigated to line 462 and saw that there was an error: “Flow of control cannot leave a Finally block.”

clip_image002

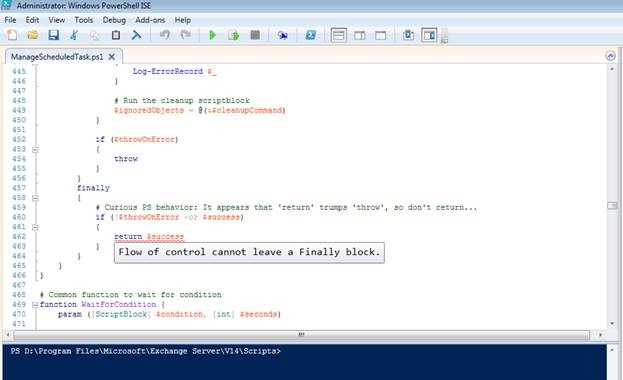
I backed up the file before changing that line to: “Write-Verbose $success”

clip_image003

Then rerun the setup and it completed successfully!

Just to be on the safe side, after the installation finished successfully I’ve returned the backed up script

Exchange 2010: Get-MailboxDatabase -Status for Whitespace

In exchange 2010, event id 1221 does not exist anymore, and in order for us to find the whitespace, Microsoft has provided an appropriate command shell:
Get-MailboxDatabase -Status |ft name,databasesize,availablenewmailboxspace -auto

image

image

Add New exchange 2010 certificate – from CA

On your Exchange Server, Open the Management Console then from Server Configuration, Click on “New Exchange Certificate”

Enter A name for your Certificate, then click Next

Leave the ” Enable Wildcard Certificate ” un-checked, then click Next

Select the services that this exchange certificate will handle.

image

*Add or remove names -by clicking on the green Plus sign Add Or remove by selecting the name and click on the x sign

image

Click Next.

Enter Organization and Location Data. 

Specify where the Certificate Request will be saved

image

Click Next,  Then Click New

Exchange will start creating the Certificate Request

When Completed , Click Finish


Open CA web page using an Internet Browser,   For Example   http://caserver/CertSrv     Then click on ” Request a Certificate ” Link

Then Click on Advanced Certificate Request

Then Click on ” Submit a Certificate Request ”

Open the Certificate Request file you created in Exchange With Notepad  Select all Text

Paste the text into the webpage, and select ” Web Server ” from the Certificate Template list, Then Click Submit.

Select Base 64 Encoded,  then click on Download Certificate Chain.

Save the certificate

On The Exchange Server:

From the Exchange Management Console –> Server Configuration,choose the  the certificate you requested and Click on Complete Pending Request

Select the Certificate you downloaded from the CA, then Click Complete

Right click on the Certificate, select Assign services to certificate

How to set all virtual directories at once With PowerShell

For internal URLs:

$urlpath = Read-Host "Type internal Client Access FQDN starting with http:// or https://"

Set-ClientAccessServer –Identity * –AutodiscoverServiceInternalUri “$urlpath/autodiscover/autodiscover.xml”
Set-webservicesvirtualdirectory –Identity * –internalurl “$urlpath/ews/exchange.asmx”
Set-oabvirtualdirectory –Identity * –internalurl “$urlpath/oab”
Set-owavirtualdirectory –Identity * –internalurl “$urlpath/owa”
Set-ecpvirtualdirectory –Identity * –internalurl “$urlpath/ecp”
Set-ActiveSyncVirtualDirectory -Identity * -InternalUrl "$urlpath/Microsoft-Server-ActiveSync"

External URLs:

Set-ClientAccessServer –Identity * –AutodiscoverServiceExternalUri “$urlpath/autodiscover/autodiscover.xml”
Set-webservicesvirtualdirectory –Identity * -ExternalUrl “$urlpath/ews/exchange.asmx”
Set-oabvirtualdirectory –Identity * –ExternalUrl “$urlpath/oab”
Set-owavirtualdirectory –Identity * –ExternalUrl “$urlpath/owa”
Set-ecpvirtualdirectory –Identity * –ExternalUrl “$urlpath/ecp”
Set-ActiveSyncVirtualDirectory -Identity * -ExternalUrl "$urlpath/Microsoft-Server-ActiveSync

save it as a .ps1 extension and run it in Exchange Management Shell

Exchange 2003 – SMTP error 550 5.7.1 Unable to relay for user@domain.com

One of my customer got this error after adding a new SMTP domain to mailboxes.
In his case he add the email address directly from the AD to some mailboxes and then got this error when trying to send them an email to the new address.

The solution for his problem was to create a new recipient policy and add to it the new external domain.

Create a new Recipient policy:

GO to Exchange system manager –> first organization –> recipients –> Recipients policies

you can add the domain to the default policy if you need to add it to all mailboxes or you can set a new policy for specific mailboxes.

In this case I created a policy for specific mailbox filtered by OU

1. right click on Recipient policy –> New recipient policy

image

2. Choose – Email address

image\

3. Modify –>find –> Organization units

image

4. Select the OU

image

5. New SMTP Address

image

6. Write @Yourdomain

image

image

Good luck!

Error when trying to add members to distribution group in Exchange 2010

“Changes to the distribution list membership cannot be saved. You do not have sufficient permission to perform this operation on this object.”

image

In Exchange 2010  you need to enable the ability to manage distribution groups

Logon to ECP –> under Roles & Auditing –>”Default Role Assignment Policy”

Under Distribution Group—> check “MyDistributionGroup”

image

This option will allow users to add/remove members to distribution groups they own.

How to Send Email Using Telnet

How to Send Email Using Telnet:

Open CMD

1. Type telnet server.com 25 (where “server.com” is the name of the smtp (outgoing) server of your email provide

2.Type HELO server.com

3.Type MAIL FROM:User@server.com.

4.Type RCPT TO:Whatever@server.com

To write the message, type DATA and press Enter.   A.On the first line type SUBJECT: yoursubject and press Enter twice.

B.Continue typing your message.

C.Put a single period (.) on a line by itself and press Enter to send your message. The       server should say ‘Message accepted for delivery’. (Or it says 250 OK id=a long id)

5.Type QUIT to exit Telnet