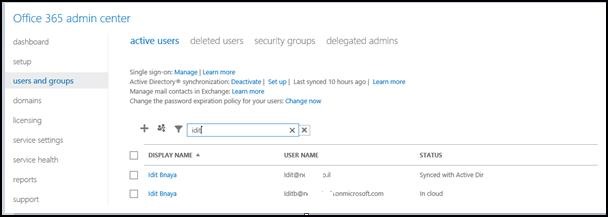
1. Assign License Using the office365 portal · From the office365 Portal · Connect to – Office365 Portal with the right permissions (Or global administrator or User management administrator) · In the left section Go to the Users and Groups · Search for the user using the Magnifying glass 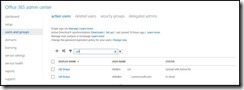 · Press on the user · In the Licenses page – Check the relevant license
· If you did not provide the user location you will be redirected to the settings page 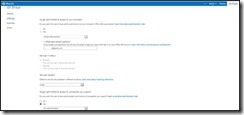 ·Add the User location __________________________________________________________________________________________________ 2. Assign License to individual users Using Microsoft Online Services Module for Windows PowerShell
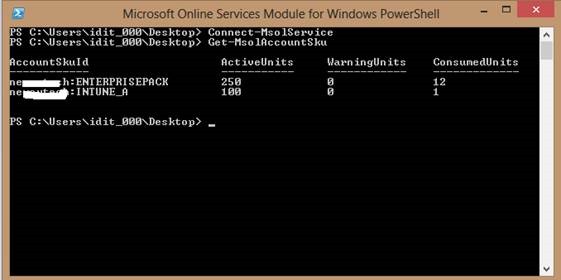
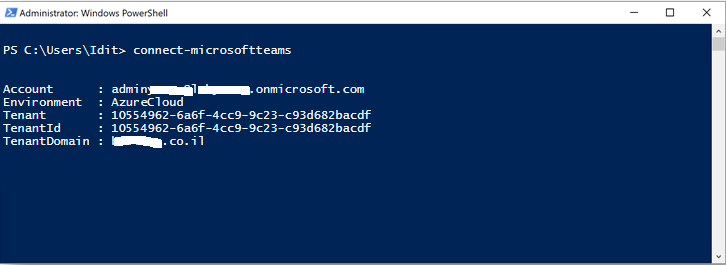
- Connect to “Microsoft Online Services Module for Windows PowerShell
*In order to do that you will need to download and install this PowerShell , you can find the download in Here
Alternatively, you can load the cmdlets manually by typing “import-module MSOnline” at the Windows PowerShell command prompt.
- Type : Connect-msolservice
- Enter the credentials of a user with the appropriate permissions (Or global administrator or User management administrator )
- Get the name of the license – Get-MsolAccountSku
- Now you need to add the location for the user you whish to assign license to (In my case the location is IL):
Get-MsolUser -UserPrincipalName idit@Domain.com |Set-MsolUser -UsageLocation “IL”
- The next step will be to assign the license :
Get-MsolUser -UserPrincipalName idit@Domain.com | Set-MsolUserLicense -AddLicenses Domain:ENTERPRISEPACK
___________________________________________________________________________________________________________________________________________ 3. Assign license to multiple users with a powershell script Sometimes you need to assign licenses to multiple users , in this case you can do it with a very simple PowerShell script This script will :
· import the users from a csv file (which you create) ,
· provide the location
· assign the license
So the first thing you need to do is to add the Users UPN of the users to a Csv file In the header of the table write– display Foe example :  Copy the following Lines to a Text file an save it as .SP1 $licenses = Import-Csv c:\temp\users.csv $licenses | ForEach-Object {get-msoluser -MaxResults 20 -SearchString $_.display | Set-MsolUser -UsageLocation “IL”} $licenses | ForEach-Object {get-msoluser -MaxResults 20 -SearchString $_.display | Set-MsolUserLicense –AddLicenses Domain:ENTERPRISEPACK} (Don’t forget to run the script with the Microsoft Online Services Module for Windows PowerShell) Remove license to multiple users with a powershell script ___________________________________________________________________________________________________________________________________________ Create the csv file for the users you want to delete the license . again , write display in the header of the table on the Microsoft Online Services Module for Windows PowerShell type: 1. $licenses = Import-Csv d:\users1.csv 2. $licenses | ForEach-Object {get-msoluser – MaxResults 1000 -SearchString $_.display | Set-MsolUserLicense –RemovedLicenses Domain:ENTERPRISEPACK} ________________________________________________________________________________________________________ Add license to all users without license
Import-Module MSOnline Connect-MsolService Get-MsolUser -all | where {-not $_.islicensed} |ForEach-Object{
Set-MsolUser -UserPrincipalName $_.UserPrincipalName -UsageLocation “IL”
Set-MsolUserLicense -UserPrincipalName $_.UserPrincipalName -AddLicenses “Domain:ENTERPRISEPACK
}
________________________________________________________________________________________
Remove specific license
Connect-MsolService
$license= “Domain:ENTERPRISEPACK”
get-MsolUser -all | Where-Object {$_.Licenses.AccountSkuID -eq $license}|ForEach-Object{
Set-MsolUserLicense –UserPrincipalName $_.UserPrincipalName –RemoveLicenses “$license”
Write-host $_.UserPrincipalName
}
__________________________________________________
Export list of all users with license:
Get-MSOLUser -All | select userprincipalname,islicensed,{$_.Licenses.AccountSkuId}| Export-CSV D:\userlist3.csv -NoTypeInformation
q Good Luck 
Sr. Cloud Solution Architect at Microsoft, I’m passionate about helping customers succeed by building secure, scalable, and innovative cloud solutions – with a strong focus on AI, DevOps practices, and end-to-end security. With a proven track record in the IT and services industry, I serve as a trusted advisor, partnering closely with organizations to guide them through digital transformation and maximize the value of their cloud investments. My role combines technical leadership with project ownership – from designing modern architectures to leading cross-functional implementations that drive real business outcomes. I also manage and empower strategic partners, working hand-in-hand with them to ensure project success and deliver measurable business impact for customers.


![6_thumb[1]](https://www.itblog.co.il/wp-content/uploads/2017/12/6_thumb1.jpg)
![7_thumb[1]](https://www.itblog.co.il/wp-content/uploads/2017/12/7_thumb1.jpg)

![9_thumb[198]](https://www.itblog.co.il/wp-content/uploads/2017/12/9_thumb198_thumb.jpg "9_thumb[198]")


